This is default featured slide 1 title

Go to Blogger edit html and find these sentences.Now replace these sentences with your own descriptions.

This is default featured slide 2 title

Go to Blogger edit html and find these sentences.Now replace these sentences with your own descriptions.

This is default featured slide 3 title

Go to Blogger edit html and find these sentences.Now replace these sentences with your own descriptions.

This is default featured slide 4 title

Go to Blogger edit html and find these sentences.Now replace these sentences with your own descriptions.

This is default featured slide 5 title

Go to Blogger edit html and find these sentences.Now replace these sentences with your own descriptions.

Saturday, December 17, 2022

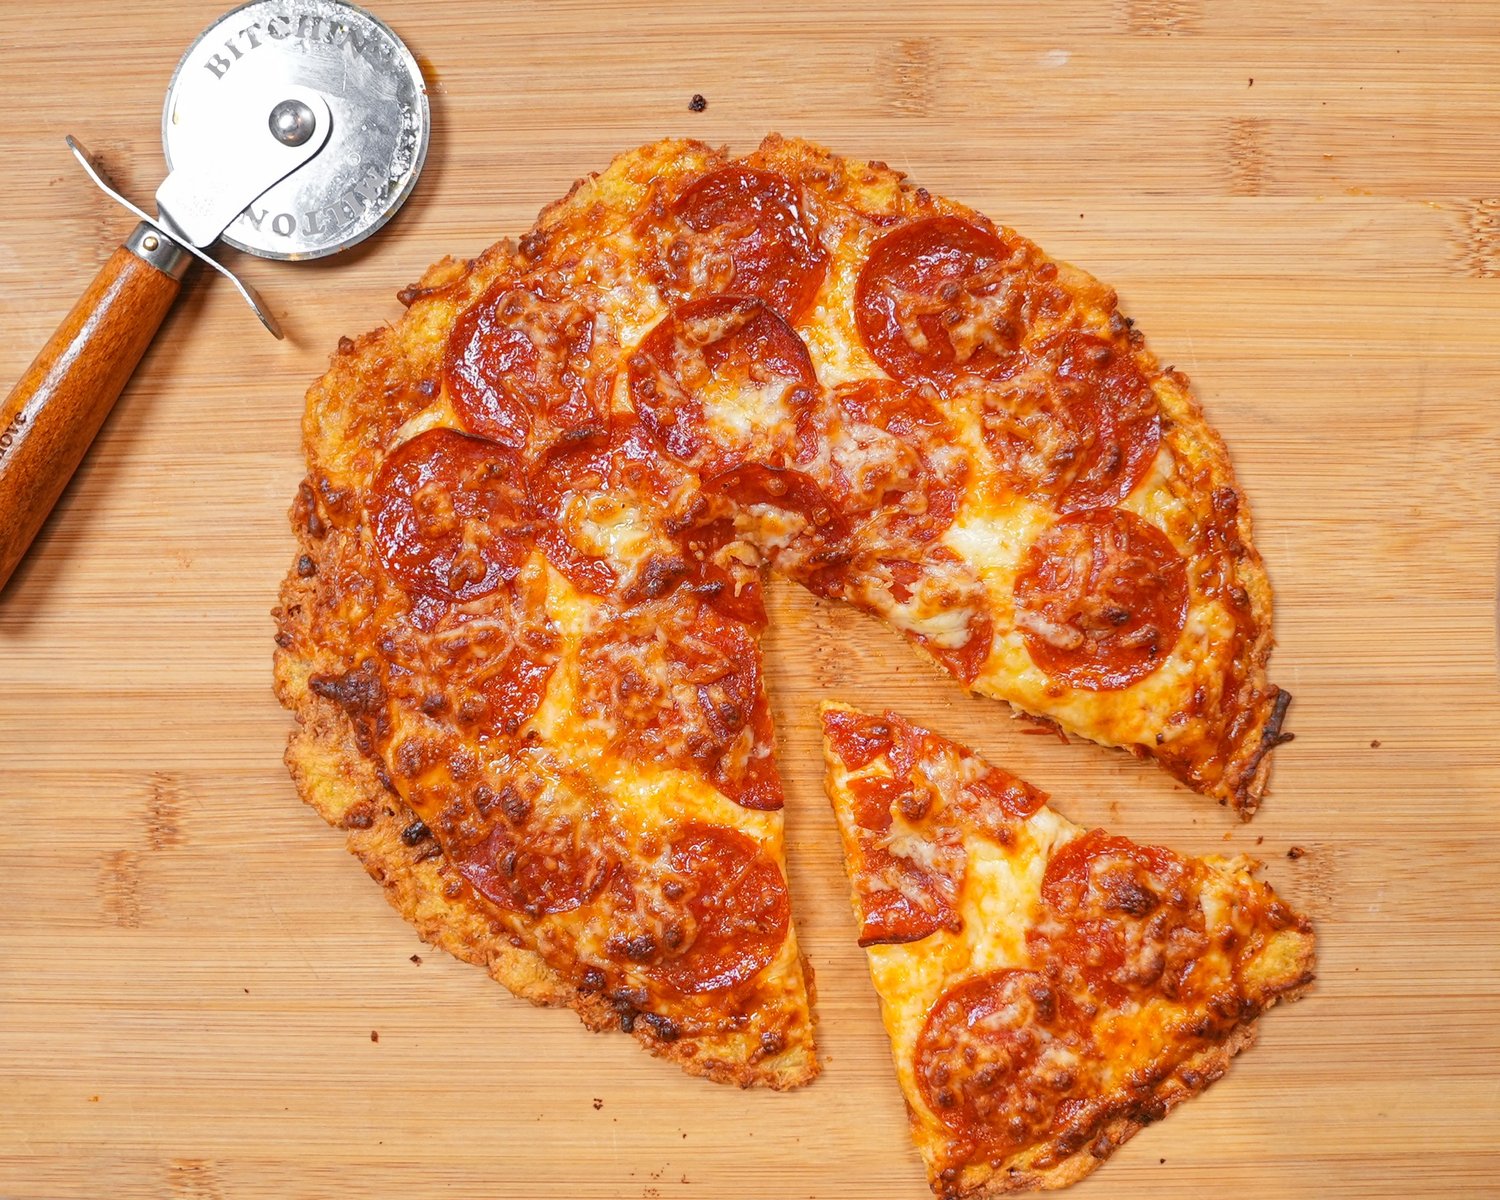
Zero Carb Crust Pizza


Ingredients:
  • 1-10oz can of chicken breast (drained)
  • 1 egg
  • ¼ cup parmesan cheese

Directions:

  1. Start by opening your canned chicken and draining. You will want to get as much moisture out as possible because you want your crust to be crispy. I even used a clean kitchen towel to get as much water out as possible.
  2. In a medium sized bowl, add your chicken, cheese and egg.
  3. Add your crust to a parchment lined baking sheet  
  4. Bake the crust for 10 minutes at 475 degrees.
  5. Remove crust and your toppings of choice! Bake for another 5-10 minutes. You can broil if you want your cheese super melty
  6. Remove from oven and allow to cool for a few minutes and enjoy!


Sunday, October 16, 2022

The Best Keto Sauces


Peanut Sauce

Ingredients:
  • 1/2 cup canned coconut milk
  • 1/2 cup peanut butter unsweetened and unsalted
  • 1 clove crushed garlic
  • 1 Tbsp grated fresh ginger
  • 2 Tbsp soy sauce
Instructions:
  1. Process everything in the food processor for a minute or two. That’s it, you’re done!


Roasted Red Pepper Sauce

Ingredients:
  • 3 large roasted red peppers
  • 1/2-1 cup freshly grated Parmesan
  • 1 cup fresh basil leaves
  • 2 cloves garlic
  • sea salt
  • 1/2 cup olive oil
Instructions:
  1. Add to the food processor, process until blended > done!


Chimichurri

Ingredients:
  • 2 cups fresh parsley leaves
  • 2 Tbsp fresh oregano leaves
  • 2-4 cloves garlic
  • sea salt
  • red pepper flakes, optional
  • 2 Tbsp red wine vinegar
  • 1/2 cup extra virgin olive oil
Instructions:
  1. Wash and spin-dry herbs and peel garlic.
  2. Destem parsley and oregano and chop very finely. Then chop garlic very finely, too.
  3. Add chopped herbs and garlic to a bowl, season with sea salt, red pepper flakes, vinegar, and olive oil. Stir well and enjoy!
  4. Finely chop herbs and garlic, mix with the rest of the ingredients > done!

Hollandaise Sauce

Ingredients:
  • 1/2 cup butter, melted 1 stick, 113g
  • 1 tsp dijon mustard
  • 1 Tbsp lemon juice
  • 2 egg yolks
  • salt/pepper, optional
Instructions:
  1. Melt the butter over low heat until almost all liquid. Remove from heat right before it's all melted and stir until completely melted. Transfer into a container with a spout.
  2. Separate eggs and put egg yolks in a bowl that fits over a small pot without touching the pot's bottom.
  3. Add dijon mustard and lemon juice to egg yolks and salt (pepper) if using unsalted butter and whisk until smooth.
  4. Bring 1 cup of water to a low simmer in a small pot and once simmering add bowl with egg yolk-mustard-lemon mixture on top and whisk constantly until slightly warm.
  5. Pour butter in a very thin steady stream to the yolk mix while continuously whisking. NEVER STOP WHISKING.
  6. Depending on how liquid and pourable or thick you want your hollandaise you either remove the sauce from the heat right away or keep whisking for a couple more minutes. When you ALMOST reached the consistency you like, remove from the heat and still continue whisking, it will thicken up still a little bit more. See video.

Homemade Mayonnaise

Ingredients:
  • 1 Tbsp dijon mustard
  • 1 Tbsp fresh lemon juice
  • 1 egg
  • sea salt
  • pepper
  • 1 cup avocado oil or any other flavorless high quality oil
  • 1 bulb garlic, optional (for garlic mayonnaise)
  • 1/2 cup herbs (dill, parsley, chives, cilantro, basil, etc.) for herb mayonnaise
Instructions:
  1. Add mustard, lemon juice, egg, sea salt and pepper to a tall jar in which your immersion blender fits all the way to the bottom. *it cannot be a wide jar, it has to be a narrow and tall jar but wide enough so the immersion blender can touch the bottom.
  2. Turn on the immersion blender on high and blend for 10-15 seconds.
  3. Then add approximately 1 cup of oil (maybe more depending on the size of the egg, so have more on hand) in a steady thin stream while the immersion blender is constantly going. The stream should be about as thick as a thick spaghetti and the blender has to be on all the time (see video).
  4. Once the immersion blender has a hard time blending in the oil anymore because the mayo is becoming too thick, you start moving the immersion blender up an down a little adding very little more oil from that point on until you reach your desired consistency. (Creamy liquid or thick and spreadable). The thicker you want it, the more oil you'll want. Be careful at this point to not over mix or you mayonnaise will start curdling. 
  5. Once the mayo is done you can store it in an airtight container in the fridge for up 1-2 weeks depending on how fresh the egg was. At this point you can also flavor the mayo further.
  1. Herb Mayonnaise: for the herb mayonnaise all you do is finely chop up about 1/2 cup of soft herbs (I don't recommend hard herbs like rosemary/thyme etc. they are pretty strong and hard uncooked) and mix them into the mayo. Use either parsley, dill, chives, cilantro, basil or a combination of them. Herb mayo does not last as long as regular or garlic mayo.
  2. Garlic Mayonnaise: you can either use 1/4 cup of the finished mayo and blend it with 1-2 cloves of raw garlic until super smooth and then mix back into the big batch of mayo OR what I prefer: roast 1 bulb of garlic (papery peel off, but cloves intact and top ends cut off > see video) in a cocotte or in aluminum foil in a 400F preheated oven for 40-50 minutes, then add the peeled roasted garlic cloves to about 1/4 cup mayo and blend, then mix back into the big batch of mayo.
  • Notes:

    *if the oil is added in an unsteady stream, too much at one point, you risk the mayonnaise curdling
    *if you don't run the immersion blender consistently, you risk the mayonnaise curdling
    *I do not recommend olive oil for mayonnaise, it tastes very bitter. If you want to use olive oil I recommend using maximum 1/4 cup olive oil and 3/4+ cups flavorless oil


    Original recipe website https://greenhealthycooking.com/the-best-keto-sauces/


    Keto “Almond Joy” Bites


    Ingredients:

    • 1 ¼ cup unsweetened coconut flakes
    • ¼ cup low carb powdered sweetener
    • 4 tablespoons coconut oil divided
    • 3 tablespoons butter, unsalted and softened
    • ½ cup Lily’s baking chips
    • 12 almonds     

    Instructions:
    1. Place the coconut flakes, sugar substitute, butter and two tablespoons of the coconut oil into a food processor or blender, and pulse until the mixture is well combined and has formed a thick mixture that clumps together. 
    2. Form the mixture into 12 evenly shaped balls, and place them on a parchment lined baking sheet, flattening them slightly with your hand. 
    3. Press an almond into the center of each fat bomb bite.
    4. Place the tray into the freezer to set for one hour.
    5. Add the baking chips and remaining coconut oil to a bowl that is microwave safe. Heat the mixture for 30 seconds at a time until the chocolate is melted and the mixture is well combined.
    6. Let the chocolate cool slightly. 
    7. Dip the fat bomb bites into the chocolate, and place them back onto a parchment lined baking sheet. 
    8. Return the tray to the freezer for an additional 15 minutes to set before serving.

    Keto Chocolate Lava Mug Cake


    Ingredients:

    • 1 tbsp unsalted butter melted
    • 1 tbsp heavy cream
    • 1 large egg
    • 2 tbsp unsweetened cocoa powder
    • 2 1/2 tbsp powdered erythritol
    • 2-3 sugar-free semisweet or dark chocolate squares 1 inch by 1 inch

    Instructions:
    1. Add melted butter and heavy cream to a microwave-safe mug. Whisk until fully combined.
    2. Add egg and whisk until batter is smooth. Make sure there are no egg white streaks.
    3. Add half of the cocoa powder. Whisk until cocoa powder is completely mixed into the batter and no lumps remain. Add in remaining cocoa powder and mix until batter is smooth. Batter should be getting thick.
    4. Add in erythritol. Whisk until evenly mixed into batter.
    5. Place chocolate squares onto the center of the batter and gently push in until they are just covered. Don't push too far because they will sink when the cake cooks.
    6. Cook cake in the microwave at full power for about 1 minute or until the middle of the cake puffs up, the cake has pulled away from the edges of the mug and is only slightly gooey around the edges.
    7. You can top the cake with ice cream, whipped cream, sugar-free syrup or powdered erythritol. Enjoy cake while still warm. The melted chocolate center will be closer to the bottom half of the cake. If you want easier access to the chocolate center, you can also flip the cake upside down onto a plate. This will also allow all the melted chocolate to pour over the cake. Enjoy the cake while it is still warm.

    Notes:

    • I used a 1100 watt microwave. If your microwave has a significantly different wattage, you may need to adjust cooking time or power.
    • The cake will not rise too high so an 8 oz mug should be large enough to cook the ingredients in without the batter spilling over.
    • I prefer a bittersweet dark chocolate cake. If you prefer something sweeter, you may want to add a little more erythritol to the batter.
    • Make sure to use powdered erythritol and not granular. Granular will not have enough time to melt with the short cooking time. If you don't have any powdered erythritol on hand you can easily grind up the granular in a food process to make it powdered. Powdered Swerve will also work.
    • Make sure to follow the steps listed for mixing the ingredients in the order I list in the instructions. It will make whisking the batter much easier. If you try to add too many ingredients at once, it will be difficult to mix the batter and you may end up with lumps of cocoa powder.
    • Your chocolate squares should be about 1 inch x 1 inch. I used Lily's chocolate.* If you use their bars, 2 of the small rectangles is about 1 inch by 1 inch.
    • You can add 2-3 (one-inch) squares depending on how much melted chocolate you prefer. I found 2 (one-inch) squares to provide a decent amount of chocolate inside. 3 will cause more chocolate to sink to the bottom but then I just flip the cake over onto a plate and spread the chocolate across the surface.
    • *Some of the product links contained in this post are affiliate links. Much like referral codes, this means I earn a small commission if you purchase a product I referred (at no extra charge to you).
    • The estimated nutrition carbohydrates count excludes sugar alcohols. The net carbs excludes both fiber and sugar alcohols.

    Original recipe website https://kirbiecravings.com/keto-chocolate-lava-mug-cake/#recipe


    Chocolate Cherry Fat Bombs


    Ingredients:

    • 2 1/4 cups unsweetened shredded coconut
    • 1/4 cup unsweetened dried cherries * See notes
    • 1/4 cup keto maple syrup ** See notes
    • 1 cup coconut butter melted
    • 2 cups keto chocolate chips

    Instructions:
    1. In a high-speed blender or food processor, add your unsweetened shredded coconut with dried cherries and blend until just mixed. Pour into a large mixing bowl and set aside.
    2. In a microwave-safe bowl or stovetop, melt your coconut butter with your sticky sweetener of choice. Pour into the dry mixture and mix until well combined. Transfer to a lined 8 x 8-inch pan and press firmly in place. Freeze for 20-30 minutes, or until firm. 
    3. Once firm, use a lightly wet, sharp knife and slice into 20 bars. Melt your chocolate chips of choice. Moving quickly, use two forks to dip each cherry coconut bar in the melted chocolate and ensure it is evenly coated. Repeat the process and refrigerate until the chocolate firms up. 

    Notes:

    * To keep this keto, I used 1/4 teaspoon cherry extract and 1 teaspoon pink pitaya powder. You can adjust this according to taste.
    ** Maple syrup or honey (not strictly vegan) are my preferred sweeteners. To keep it keto-friendly, I use monk fruit sweetened maple syrup, linked in the post. 
    No Bake Paleo Vegan Chocolate Cherry Fat bombs should be kept refrigerated at all times.
    They are freezer friendly, but wrap each bar individually to avoid them sticking together and getting freezer burns. 
    Original recipe website https://thebigmansworld.com/no-bake-paleo-vegan-cherry-coconut-bars-keto-sugar-free/#recipe


    Keto “Puppy Chow”


    Ingredients:

    • 1 bag pork rinds (3 – 3.5 oz)
    • 4 TB butter (preferably salted)
    • 1/4 cup coconut oil
    • 1/8 tsp vanilla extract
    • 3 TB sweetener (such as Swerve granular)
    • 1/4 cup natural peanut butter
    • 3 TB unsweetened dark cocoa powder
    • 1 TB Swerve confectioners

    Instructions:
    1. Break up the pork rinds into bite sized pieces in a large bowl, then set aside.
    2. Melt the butter and coconut oil in a saucepan over low heat, then whisk in the vanilla extract and sweetener.
    3. Once the sweetener has dissolved, whisk in the peanut butter and cocoa powder. Continue to whisk for a minute or two, until there the sauce is completely smooth.
    4. Pour the chocolate sauce over the pork rinds and mix with a large spoon, spatula or your hands (wearing plastic gloves) until thoroughly coated.
    5. Spread the pork rinds on a cookie sheet, lined with parchment paper or a silicone mat. Dust with 1 TB of Swerve confectioners (see video for a tip). Chill for at least one hour for the chocolate to set.
    6. Transfer the “puppy chow” to a storage container or zip-loc bag and store in the fridge.

    Link to original recipe website https://www.seriousketo.com/archives/6886


    Oven-baked Salt and Pepper Pork Riblets


    Ingredients:

    • 3 lbs pork riblets – cut into bite size
    • 2 tablespoon olive oil (to brush)
    Marinade:
    • 1 teaspoon salt
    • 1 teaspoon ground white pepper
    • 2 teaspoon five spice powder
    • 2 tablespoon rice wine
    • 1 tablespoon sesame oil

    Coating:

    • 4 cloves garlic – roughly chopped
    • 2 jalapeno peppers – thinly sliced
    • ½ teaspoon sea salt
    • 1 teaspoon ground white pepper
    • 1 tablespoon olive oil

    Instructions:
    1. In a large mixing bowl, add all the marinade ingredients and mix well. Then, add the bite-sized pork riblets and cover all areas of the riblets evenly with the marinade. Cover and refrigerate for at least two hours, overnight is better.
    2. Pre-heat the oven under 350 degrees Fahrenheit.
    3. In a baking sheet, brush the olive oil onto the sheet. Then, place each riblets onto the baking sheet and brush the riblets with olive oil as well.
    4. Once heated, place the baking sheet into the oven and bake it for one hour.
    5. When the time is up, set aside the baked riblets about 5 minutes to cool down a bit.
    6. Heat up one tablespoon of olive oil in a skillet under medium heat. Once the oil is a little bit smoky, add garlic and give it a quick stir. Only cook it until it is a bit brownish, do not let it burn.
    7. Turn off the heat and quickly add the riblets into the skillet. Then, add jalapeno pepper and sprinkle with sea salt and white pepper. Toss all of them to evenly mixed.
    8.  The riblets are ready to be served and it is great when it’s paired with warm fluffy rice.